Monthly Archives: March 2014

peanuts

D.I.Y. Peanut butter

I stared at the gaping space on the shelf where our favorite peanut butter usually was. I should have seen it coming, but like all such calamities, I didn’t understand the signs until it was too late….

It started small, as these things usually do, just a small gap on the grocery store shelf. The crunchy peanut butter was missing. No biggy. We weren’t completely out; if we were frugal, we would last another week with what we had at home. A few days of peanut-butterless existence wouldn’t be the end of the world.

The next week, when I returned to the grocery store, still no crunchy peanut butter. I just shrugged my shoulders and thought, “Well, I’ll try the smooth.”

But the third week rolled around, and the full enormity of the disaster finally forced itself on me… like a cavernous hole on the grocery store shelf. No crunchy peanut butter. No smooth peanut butter. I stared at that vacant real estate. How could I go home without peanut butter? There would be bitter recriminations, riots, chaos.

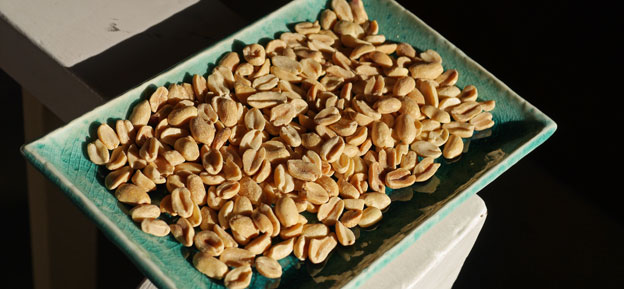
Then the proverbial light bulb turned on. Why not make my own peanut butter? The stuff I usually get has just the one ingredient: organic roasted peanuts. How hard could it be? At $2.99 a pound for bulk organic roasted peanuts, it would be worth trying. I helped myself to a couple of scoops of peanuts, and brought them home.

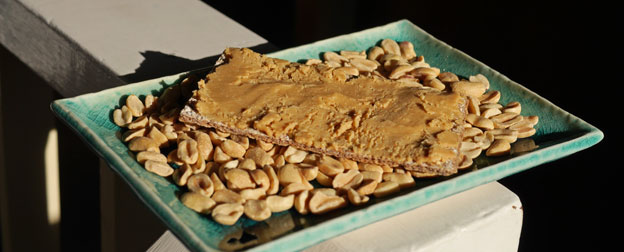
A couple of days later, we got to the bottom of the jar of the store-bought P.B. I screwed up my courage, pulled out the food processor, tossed in the nuts, and started pulsing. The nuts were quickly pulverized. Once they were mealy crumbs, they stayed that way, but undeterred, I pushed everything down, and kept pushing the ‘Pulse’ button on the food processor. Finally, the peanuts transformed into familiar gooey peanut-buttery goodness. I reached in, took a tentative taste. Still grainy, but not bad, so I ran the processor some more, until the P.B. gathered itself up in a rough ball and rode around on the blades. I tasted again. My D.I.Y. P.B. had a delicate flavor, and a satisfying, slightly grainy, mouthfeel. The store-bought P.B. had a more robust peanut flavor, a darker color, and was smoother, but I thought my P.B. was pretty good for an improvised effort. The DD and DS both liked my D.I.Y. P.B. better that the store-bought, and told me not to bother getting the store-bought anymore. Armageddon averted!

The next day, we had an unexpected (mostly vegetarian) guest who stayed for lunch. I scoured the pantry and fridge to pull together a meal, and put together a salad, a loaf of brown soda bread, and cheese, hummus, and that D.I.Y. P.B., thinking the kids and I could stick to the P.B. and cheese, and our guest would enjoy the hummus, but he dug into that P.B. and kept on digging! He loved it!

O.K. Now I felt encouraged. This week, still no P.B. on the grocery store shelf. I bought another bag of peanuts, and this time, I tried adding peanuts into the work bowl of the food processor in two stages to see if I could make crunchy P.B.

It’s good peanut butter. It’s cheaper than store-bought. And it takes about 5 minutes to make. Sounds like a win-win-win to me!

I’m sharing the recipe, even though I plan to keep playing with it (stay tuned for updates). Many peanut butters have added salt and honey or sugar, not to mention oil, but since my favorite store-brand doesn’t have any added ingredients, there ought to be a way to get the same results at home. Will roasting the peanuts a little more boost the peanut flavor and deepen the color? Even longer processing? My grocery store only stocks one species of peanut, but do different peanut species make better or worse peanut butters? What do you think? Do you prefer P.B. with just peanuts, or with added salt, sweetener, and/or oil?

peanuts-and-peanut-butter

Recipe: Peanut Butter

See the story of how I was nudged into making my own peanut butter by circumstances beyond my control. UPDATE: I improved this recipe, here.

Recipe: Peanut Butter

Ingredients

  • 1 pound dry-roasted, unsalted peanuts
  • salt (optional)
  • honey or sugar  (optional)
  • oil (optional)

Preparation

For smooth peanut butter: Place the peanuts in the work bowl of a food processor. If desired, add salt, honey or sugar, and/or oil to taste. Pulse the nuts until smooth and viscous, about 5 minutes. Use a spatula or wooden spoon to push down the peanuts two or three times. When the peanut butter is ready, it gathers itself into a rough rough ball and rolls around on top of the food processor blades. Taste and adjust the seasonings, if using. Transfer to a glass jar and store at room temperature.

For chunky peanut butter:  Place ¾ pound peanuts in the work bowl of a food processor. If desired, add salt, honey or sugar, and/or oil to taste. Pulse the nuts until smooth and viscous, about 5 minutes. Use a spatula or wooden spoon to push down the peanuts two or three times. Continue pulsing until the peanut butter gathers itself into a rough rough ball and rolls around on top of the food processor blades. Push down and spread out the peanut butter ball at the bottom of the work bowl, sprinkle in the remaining ¼ pound peanuts, and pulse until the peanuts are chopped and incorporated into the rest of the peanut butter, another minute or two. Taste and adjust the seasonings, if using. Transfer to a glass jar and store at room temperature.

birthday-ice-cream-cake-2

“If all else fails, try chocolate!” or, “Happy birthday, DS!”

Everyone in my family has a favorite sweet treat for his birthday. For me, it’s chocolate cake, for the DH and the DD, apple pie à la mode, and for the DS, ice cream cake. Until this year, we got the ice cream cakes made-to-order from the premium ice cream store. He loved making the cake unique, choosing the flavors, the base layer, the toppings, and the frosting color. Since he also hated drawing attention to himself, he would balk at letting us declare “Happy Birthday!” on top, so there would always be a tug-of-war over whether to have any writing on top, and what it should say — “No, I am not getting you a birthday cake that says: If all else fails, try chocolate!”

We skipped that particular negotiation this year because of Thanksgiving. (I don’t know about you, but for this Cozy Foodie, it always comes back to Thanksgiving!) Anyway, I found an over-the-top recipe for pumpkin ice cream pie (Bon Appétit, November 2008, on epicurious.com): a graham cracker crust, a layer of pure vanilla ice cream topped with another layer of pumpkin-laced vanilla ice cream, all studded with chocolate-almond bark. Oh my goodness!

I’ve been on the look-out for another chance to make ice cream cake ever since then, and when the DS said he’d like an ice cream cake for his birthday, I said: “Wouldn’t it be nice if we made it? Remember Thanksgiving?” Well, that settled it.

He chose vanilla-brownie chunk for one layer, and cherry-chocolate chip vanilla ice cream for the other. Since there wasn’t anywhere near enough chocolate in this sugar-and-cream hunk ‘o’ happiness, I suggested a base made from chocolate cookies, with more chocolate cookie crumbs sprinkled in the middle, and chocolate-almond ganache on top. There were no cherries at the supermarket, but no problem, strawberry was his second choice, and I made the switch on the fly.

If you have an ice cream maker, ice cream cakes with homemade ice cream are dead easy to make. They just take a little advance planning to allow the freezer insert for the ice cream maker to refreeze in between the two batches of ice cream, and for the second layer to firm up. Of course, they’re just as delish if you simply pick up a couple of quarts of your favorite ice cream.

This cake had a lot of love packed into it: everyone in the family wanted to share in the glory of claiming, “I made that!” The DD and the birthday boy himself made the vanilla-brownie layer — they’re actually usually the ones in charge of making ice cream in our house. The DH and I made the strawberry layer, and I made the base, the middle, and the topping. This cake really made the DS feel special as he officially crossed into his teen years. And it didn’t say “Happy Birthday!” on top, either.

The cake was so good that the DH was busily planning what flavors ice cream he was going to get for his birthday ice cream cake, when I asked: “So does that mean that you don’t want apple pie for your birthday?” I could hear the gears grinding in his head as he mulled over this painful choice. Finally, I let him off the hook. “Father’s Day is just a month after your birthday….” I’m already plotting the perfect ice cream cake just for him: maybe favorite flavors like mint chocolate with chocolate chunks, cherry vanilla with white chocolate chunks, and chopped chocolate covered almonds in between the layers? Or ice cream layers of vanilla with chopped macadamia nuts and chocolate chunks, and guava sherbet, topped with a “sand” beach of finely-ground graham cracker crumbs, a cocktail umbrella, and an “ocean” of blue icing to remind him of our vacation in Hawaii?….I feel another tradition being born!

Here’s the recipe for the DS’s (Birthday) Ice Cream Cake. What would make an ice cream cake truly special for you?

birthday-ice-cream-cake

Recipe: (Birthday) Ice Cream Cake

Read the story behind the creation of the DS’s ice cream cake (for his birthday).

Recipe: (Birthday) Ice Cream Cake

Makes 12-16 servings

Ingredients

  • ½ cup slivered almonds
  • 10 ounces chocolate cookies (see Notes)
  • 3 tablespoons sugar
  • 6 tablespoons unsalted butter, melted

For vanilla-brownie chunk ice cream (see Notes):

  • 2 large eggs
  • ½ cup sugar
  • 2 cups heavy whipping cream
  • 1 cup milk
  • 2 teaspoons vanilla extract
  • 1 cup brownie, cut into ½ inch dice

For strawberry ice cream (see Notes):

  • 2 cups fresh or frozen strawberries
  • 3 to 4 tablespoons sugar, depending on the sweetness of the strawberries
  • Juice of ½ lemon
  • 2 large eggs
  • ½ cup sugar
  • 2 cups heavy whipping cream
  • 1 cup milk

For the ganache topping:

  • 6 ounces bittersweet chocolate, chopped
  • ½ cup heavy whipping cream
  • 1 ½ tablespoons dark corn syrup
  • ¾ teaspoon vanilla extract
  • pinch of salt

Preparation

Preheat oven to 350°F. Spread the almonds in one layer on a metal tray. Roast the almonds until fragrant and lightly browned, about 5 minutes. Remove from oven, but leave oven on. In a food processor, pulse the cookies until they are ground to a coarse crumb. Alternatively, place the cookies in a resealable bag. Use a large can (of tomatoes or soup, for example) to crush the cookies until they are ground to a coarse crumb. Transfer all the crumbs to a bowl, then return 1½ cups of crumbs back to the food processor or resealable bag. Continue processing or crushing the crumbs until they are finely ground. Set aside the coarse crumbs for sprinkling between the two ice cream layers.

Make the base: In a medium bowl, mix together the finely ground cookie crumbs and sugar. Add the melted butter. Stir until the mixture is evenly moistened. Line the bottom of a 9-inch diameter springform pan with 2¾ inch sides with a round of parchment paper. Press the crumb mixture onto the bottom of the springform pan. Bake until set, about 12 minutes. Cool to room temperature.

Make the vanilla-brownie chunk ice cream: In a mixing bowl, whisk the eggs until they are light and pale-colored, about 2 minutes. Slowly add the sugar, whisking until well blended, about 1 minute. Add the cream, milk, and vanilla; whisk until blended. Transfer the mixture to an ice cream maker, and freeze following the manufacturer’s instructions. A couple of minutes before the ice cream is done, add the diced brownie. Mix in and continue freezing until the ice cream is done. Scoop the ice cream into the springform pan. Using an offset spatula, smooth the top. Sprinkle the coarse cookie crumbs on top. Store the cake in the freezer while preparing the second ice cream layer.

Make the strawberry ice cream: Defrost frozen strawberries, or wash, dry, and hull fresh strawberries. Slice the strawberries, and transfer to a bowl. Stir in the sugar and lemon juice. Cover and refrigerate at least one hour. Meanwhile, in a mixing bowl, whisk the eggs until they are light and pale-colored, about 2 minutes. Slowly add the sugar, whisking until well blended, about 1 minute. Add the cream and milk; whisk until blended. Mash the strawberries, drain the juices into the cream mixture, and stir to combine. Transfer the mixture to an ice cream maker, and freeze following the manufacturer’s instructions. A couple of minutes before the ice cream is done, add the mashed strawberries; mix in and continue freezing until the ice cream is done. Add the ice cream to the springform pan. You may have some left over; save for another use, or eat it immediately! Using an offset spatula, smooth the top. Store the cake in the freezer while preparing the ganache.

Make the ganache topping: Place a metal bowl over a saucepan with simmering water. The metal bowl should not touch the water. Place the chocolate, cream, and corn syrup in the metal bowl. Whisk until chocolate is melted and the mixture is smooth. Add the vanilla and pinch of salt, and whisk until combined. Remove the bowl from the saucepan. Carefully dry the outside of the bowl with a towel, and allow the mixture to cool to room temperature. Pour the ganache evenly over the ice cream, and sprinkle with the toasted almonds. Return the cake to the freezer for at least 45 minutes, or until the ganache is set.

Before releasing the cake from the springform pan, wipe a warm, damp kitchen towel around the outsides and underneath the pan a couple of times. The cake should now easily release from the sides and bottom. Similarly, before cutting the cake, warm the knife in a tall glass of hot water.

Notes: Substitute 2 quarts of your favorite flavors of homemade or store-bought premium ice cream. Soften the ice cream gently in the microwave on a very low setting to make it easier to spread. For the base and in between the ice cream layers, I used a 10-ounce bag of Mi-del brand Chocolate Snaps. Chocolate graham crackers would work well too, or your favorite plain, crisp chocolate cookie.